SAML MFA authentication for VMware Horizon using Thales Safenet Trusted Access
Background
I have been working on a project to integrate many platforms with Thales Safenet Trusted Access to enable multi-factor authentication to improve access security to those platforms. One of those platforms is VMware Horizon.
Since the release of Horizon version 7.11, SAML based authentication has been a supported protocol for enabling MFA. Prior to this, it was only possible to use RADIUS based authentication to enable MFA, which has some limitations. namely that as far as I know it does not support conditional access and does not support push notifications for One Time Passcode soft tokens.
Safenet Trusted Access support a lot of applications out of the box, but Horizon is not one of them. This guide will show you how to make it work.
How to
Before we begin, I am going to make a few assumptions. For this, to work, you need to be running a Horizon Unified Access Gateway appliance as well as a minimum of Horizon 7.11. I will also assume you have an active Thales Safenet Trusted Access subscription.
Step 1 – Configure a new application in STA
Login into STA and choose the option to add a new application.
Locate the Generic Template option and click add.
Give the application a meaningful name. I called mine VMware Horizon Access. Ensure SAML is selected.
On the next screen, click to switch to manual configuration.
Make a note of the two URLs and download the certificate, you will need these later.
After clicking the next step button, click the manual configuration link for Step02: STA Setup
As shown below, complete the URLs as shown. Replace the FQDN with the FQDN of your Unified Access Gateway. For step 4 below, you will need the certificate used to secure the UAG appliance.
1 2 3 |
Entity ID = https://YOUR.UAG.FQDN.com/portal Logout URL = https://YOUR.UAG.FQDN.com/portal/samlsso Assertation Consumer Service = https://YOUR.UAG.FQDN.com/portal/samlsso |
I used the full certificate chain in PEMfor mat for this.
The certificate should then show something like below.
The reason the certificate is uploaded is so that STA will only accept requests originating from a source secured by this certificate.
The only other thing to change is the user Login ID Mapping. This should be SASUser ID. The way the user name is stored in STA should match the name format a user uses when logging in with a domain account. If they don’t match, this won’t work.
Then target the application to all users or a subset of users.
Step 2 – Create SAML Metadata XML file
You may have noticed in the previous steps, there was an option to download a preconfigured Metadata file from the STA portal. For some reason, Horizon does not like this prebaked metadata file, so I will walk you through creating a new one.
The Metadata file contains all the relevant information about where the identity provider service runs from and how to access it. This file is imported into the UAG to allow it to communicate with STA.
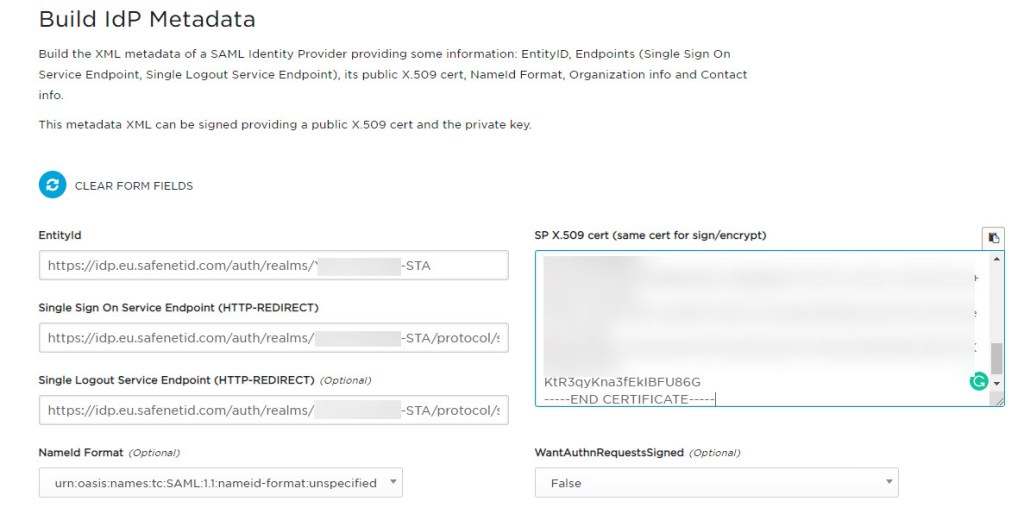
Open the certificate downloaded in step one in your favorite text editor and select the contents of the certificate. This will be used as part of the metadata XML file creation.
Head over to this webpage https://www.samltool.com/idp_metadata.php to create a new metadata XML file.
Paste the certificate into the cert box and paste the URL’s you copied earlier into the boxes as below.
Scroll down the page and click Build IDP Metadata. Then copy the contents of the metadata generated.
Paste the contents into a text document and save the file as an XML file as below.
Step 3 – Configure Unified Access Gateway
Login to the admin portal for the UAG.
Scroll down to Upload Identity Provider Metadata
Select the Metadata.XML file created in step 2
Click save.
Open the Horizon Settings.
Click the more settings button.
Change Auth Methods to SAML and Passthrough and ensure the Safenet Identity Provider is selected and click save.
Step 4 – Configure Connection Servers.
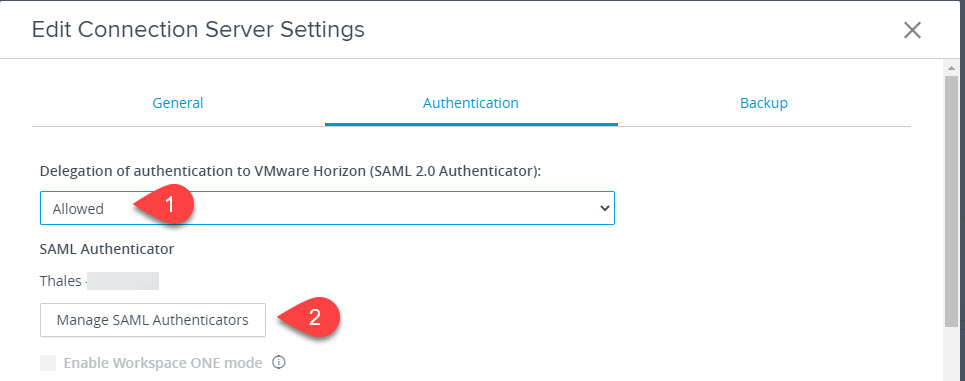
Log in to the admin interface on the connection servers the UAG is paired with. Browse to servers, connection servers and click edit.
Click on authentication, change the delegation of authentication settings to allowed and then click Manage SAML Authenticators.
Click Add.
Give the authenticator a name and then paste the contents of the metadata.xml file into the SAML Metadata box.
And that is the configuration part complete.
Step 5 – Login experience and conditional access
Browse to the UAG as if you were going to login to access a desktop resource.
Clicking Horizon HTML access will redirect to the STA identity provider. Click Login.
My setup triggers a push notification to my mobile phone where I verify access.
Which then prompts for the usual username and password prompt.
Which takes you to your assigned resources.
Click the resource to launch and away you go.
Step 6 – Conditional Access
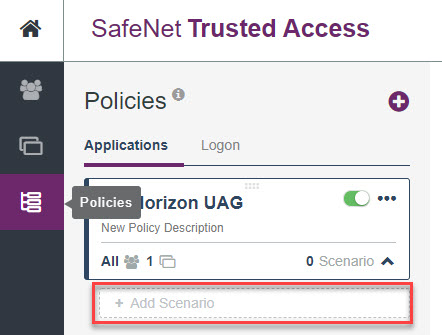
Back to the STA portal, we can define different access policies for the users. You may want to block access from certain IP ranges or versions of operating systems for example.
Click to add a scenario to the base access policy.
In this example, users accessing VDI from a Windows 10 device will be granted access but will have to provide a password and one-time passcode.
These policies can be built up to suit your access requirements to further lock down access to the Horizon environment.
Further reading
If you would like to take this a step further to enable full single sign-on, IE no password entry on the desktop, then take a look at TrueSSO from VMware. This can be integrated with the above setup to enable certificate-based authentication to the desktop and eliminate the requirement to enter a password.


